Showing posts with label How To. Show all posts

Monday, May 21, 2018

5 Ways How Bloggers Make Money

A lot of people think that bloggers write witty anecdotes about their cats and somehow money flies out of their screens. Unfortunately, that’s not the case. There are many factors that determine how much a blog can make. That’s why this list is going to demystify five of the most common ways bloggers make money.

1. Ad Revenue

From banner ads to contests and give-a-ways, ad revenue can take a variety of forms. That being said, bloggers don’t just slap on any old ad and call it a day. The ads in question need to be relevant to the target audience or else blog owners run the risk of driving away their readers.
Some less obvious advertisement methods include:
• Sponsored Posts
• Ad Networks
• Newsletter Advertising
• Video Ads
• Text links
• Cross promotion Campaigns
Pay close attention the next time you go to your favorite blog and you might notice a few of these.

2. Selling Products

It’s not uncommon to see bloggers promoting their own products as opposed to promoting someone else’s. That’s because there’s serious money to be made if you’ve got enough traffic and subscribers. Sites like ProBlogger potentially make hundreds of dollars a day by selling things like e-books or T-shirts.
While the products might differ they all share one thing in common: their products complement their respective niches. So if you’re thinking about selling your own line of backscratchers from your music blog, make sure your audience would actually buy them.

3. Affiliate Marketing

This one’s a major money maker for shopping-oriented blogs. Basically, blog owners get paid a small commission every time their readers purchase anything using their link.
Affiliate marketing synergizes well with blogs that get high traffic daily. It’s not unheard of for lesser-known bloggers to make a killing on product referrals alone. So, if you ever wondered why they always pushed so hard for their readers to use their links or discount code, now you know.

4. Providing Service(s)

It’s no secret that small businesses use their websites as a way to supplement their services. But you don’t need to be a business to provide a service to your readers, especially if you’re an expert in your field. Plenty of bloggers offer things like coaching, freelance skills, and consulting services to any and everyone. It’s not uncommon for someone to meet most of their clients through their blog.

5. Capitalizing on Events

If you’re good at what you do, people will notice. When they do, they’ll likely invite you to conferences, take you out to lunch, and pay for you to be a guest speaker. Events like these benefit the blogger in two ways: first, the blogger is compensated in some way to be there. Second, they’re indirectly promoting their blog and increasing their already large audience. It’s almost like they’re getting paid to advertise.

Summary

Whether you’re a new blogger or an outsider looking in, remember that the key to online financial success depends on a diversified income stream. A blog should serve as a foundation for this rather than the end goal.

Sunday, May 6, 2018

Quick Tips for Turning Your Dissertation into Published Journal Articles

“Publish or perish” is a familiar saying in academia. While the situation is not quite that pressing, postdoctoral professionals do start to feel the pressure to publish early on because it establishes their credibility and fleshes out their resumes. Since your dissertation is based on your own original research, there is nothing holding you back from getting some extra mileage out of it by turning it into a series of journal articles.

For further information and best practices to help guide you through publishing your dissertation, the Center for Innovation in Research and Teaching (CIRT) offers a Dissertation to Publication online training program.


Brainstorming

Ideally, you will start planning your articles soon after successfully defending your dissertation, or perhaps even beforehand. Consider which chapters or subsections would be best suited to find new life as independent papers. Write a list of academic journals you would like to submit to. Since you have just spent a significant amount of time buried in academic journals, you could probably do this in your sleep.

Creating an Editorial Calendar

Once you have got the basic framework of a plan in place, it is time to start a new spreadsheet document. Fill in the fields with your paper topics, the journals you will submit them to, and your deadlines for completing them. Ambition is a great quality, but do try to set reasonable deadlines, especially if you are simultaneously working your way up in your chosen industry. Some articles will practically put themselves together, while others require long, intensive writing and editing sessions. Do not sacrifice quality in the name of speed.

Checking Publication Guidelines

Doctoral learners are encouraged to include a copyright page in their dissertations, and to register the copyright. This avoids any potential problems with breach of copyright. Most journals will not mind publishing papers even if they were previously published as part of a dissertation. You should always check the applicable policies, however, especially if your dissertation has been published online. It is good form to communicate with the journal editor about any possible issues before spending hours rewriting and formatting the paper.

Avoiding Salami Slicing

Vegetarians may cringe at this reference, but salami slicing has nothing to do with deli meat. It refers to the “slicing” of a large research study into a series of papers, each of which is dependent upon the information presented in the others. Another way to define salami publications is that they are multiple papers derived from the same research questions, methodologies and populations.

For example, the first journal article may review findings from comparing Group A with the control group, and the second article may cover Group B compared to the control group. Salami slicing is considered an unethical practice, although many doctoral learners may inadvertently commit this faux pas without realizing the ramifications. There is an easy way to avoid salami slicing. Make sure that each journal article you compose from your dissertation can stand on its own, without drawing on data from any other article. It should make its own unique contribution to the field, and have its own key element.

The College of Doctoral Studies at Grand Canyon University is pleased to offer academically rigorous degree programs to help our students pursue their career aspirations and contribute to their chosen fields of study. Click on the Request More Information button to begin your journey on our supportive, faith-based campus.

Thursday, April 26, 2018

How to enable the new Gmail right now


Google just updated Gmail with one of its biggest redesigns in a long time. The update brings several security features like confidential mode, which allows you to add two-factor authentication and / or set expiration dates for individual emails. Phishing alerts are also now highlighted in a much clearer way, with bold red boxes that are harder to overlook. There’s also a new Tasks integration to make your to-do lists easier to manage alongside your emails.
So, if you’re here, reading this article, obviously you’re trying to figure out how to get the new Gmail on your account. Google is still rolling this out, but here are two ways to enable it right now.

PERSONAL GMAIL ACCOUNTS

Head to your Gmail account on the web, click the gear icon in the top right corner. If the update is available on your account, you will see an option to “Try the new Gmail” up top.
Google has not made this new Gmail default for everyone yet, so if you’re not seeing it, keep checking back. The rollout is supposed to be global for all 1.4 billion Gmail users.

G SUITE ACCOUNTS

The second way to get the new Gmail is to have your system admin enable it on your G Suite account at work or school. Administrators should be able to access this as part of their Early Adopter Program by going to the Admin Console and selecting to allow users to access the new Gmail.
After the admin has turned this on, individual accounts will receive the “Try the new Gmail” option on their accounts under the Settings route.
If you finally have the new Gmail and you find that you’d rather switch back, you can head back to the Settings cog to revert to Classic Gmail. Keep refreshing and good luck!

Wednesday, April 25, 2018

How To Make Careers in Education Outside of the Classroom

For students wishing to use foundational teaching skills in a variety of different fields, Grand Canyon University offers a Bachelor of Science in Educational Studies focused on analyzing classroom teaching concepts and pedagogical practices. This program may be a good match for those interested in careers in education outside of teaching in the classroom. These may include:

Parks and Recreation

Parks and recreation departments serve the community by maintaining parks, preserves and recreation centers, and providing other resources such as pools and sports programs. The leadership skills and knowledge of educational psychology gained through an educational studies degrees could well-equip you for a career in a parks and recreation department by providing you with solid foundations that can be adapted to suit a variety of careers.

Non-Profits

Similarly, the management techniques and technical strategies included in the curriculum for educational studies could suit a career working within a non-profit organization. The emphasis in the program on inspiring change pairs well with the mission statements of organizations that support specific causes or advocate for a certain point-of-view. Traditional jobs in this area may include program director and policymaker.

Workplace Training

The skills gained through a BS in Education Studies can help prepare you to effectively train and teach in diverse learning environments. With your knowledge of leadership styles and management techniques, you may find a career as a workplace trainer to be a good fit. Companies rely on trainers to impart valuable knowledge and skills to their employees, one of the foundational areas of instruction in the education studies program.a

How to Change the World as a Biomedical Engineer

Every person has the capacity to change the world for the better, it is just a matter of finding your calling in life. If you have an interest in medical science and engineering, consider combining them. As a biomedical engineer, you will be entering a rapidly growing industry with limitless opportunities to make life better for those around you.

Prosthetics

The loss of a body part is among the most traumatic injuries—both physically and psychologically. Amputees face a lifetime of hardship, even with a prosthetic. Prosthetic limbs are not intended to last a lifetime. They can cost tens of thousands of dollars, and may only last a handful of years. This means some patients simply have to go without. As a biomedical engineer, you could help develop new, less expensive ways of producing prosthetics.

Some biomedical engineering students in Ohio have been working on connecting children with missing hands to temporary prosthetics. Using 3D printers, the students create prosthetic hands for less than $20 each. These lack robotics and electrical sensors, but they provide an effective, temporary solution while the kids are awaiting a more permanent prosthesis.


Donor Organs

Donor organs save lives, but they have some major disadvantages. There is only a short window of time in which to do the transplant, which means that someone awaiting a new organ might miss the opportunity. Biomedical engineers have been working on a solution for this. It is now possible to keep a donor lung fully functional for 36 to 56 hours. This is a major advancement, considering that donor lungs have a high rate of suffering damage before transplant, and the majority of all donor lungs are unable to be used. This is just one way that biomedical engineers are working on new ways to help save lives.


Paperfuge

Biomedical engineering is a field traditionally associated with high-tech gadgetry and bulky, expensive equipment; but what about emerging nations, which often lack widespread, reliable access to electricity to power those machines? A biomedical engineer from California has developed an ingenious way to build a centrifuge that operates with manpower—literally. A trip to Uganda, where he saw an expensive centrifuge being used as a doorstop, inspired this researcher to modify the whirligig toy. The whirligig is a simple, non-electrical toy that features a disk with holes. Two handles are attached to loops of string that extend through the holes. The twisted string stores energy, and when the handles are pulled, the energy is released. The researcher and his team used this concept to create the paperfuge—a device made out of paper that costs less than 20 cents to make, yet works as well as a pricey centrifuge. One of its many uses is diagnosing malaria—a disease that infects millions annually.

Monday, April 2, 2018

How do I apply for International Scholarships?

There are many resources available to students to search for scholarships, and there are also many services that charge students for either access to their scholarship database or to conduct a scholarship search on a student’s behalf. If you have the time and available resources, most of the scholarship searches can be found online for free. InternationalScholarships.com is one that offers a free scholarship search, and with a little research you can find many more out there. Take your time, do your homework and you will be able to find all the information you need.


For international students hoping to study in the US, scholarships can be an invaluable help toward financing your goals. Whether you are an incoming first year, a student going on to graduate school, or simply returning to college for a new year, there is financial assistance out there for you.

Ask Your School

No matter where you live or attend school, your first step when searching for scholarships should be your school’s financial aid office. Most colleges offer scholarship programs specifically for international students attending the institution. Check out your school’s financial aid website, or call or email the office if you can’t find what you’re looking for.

Am I eligible for a scholarship?

Eligibility for a scholarship depends entirely on the scholarship; there is no general rule of thumb on whether you are eligible for a financial award. Some scholarships require students to have a certain TOEFL score; some ask that you are from a certain country; some ask for you to have a certain grade point average. You will need to do your own research to see if you are eligible for a scholarship. It can be confusing, but remember that college admissions officers and financial aid experts are there to help you find as much money as you qualify for.

How do I apply?

As with eligibility, there is no set rule on how to apply for scholarships. While some just require you to complete an application form, others may require a specially written piece of work, or for you to be pursuing studies in a certain field. If you find a scholarship for which you think that you may be eligible, contact the award administrator of that award. All the scholarships found in the InternationalStudent.com Scholarship search contain contact details of the award administrator.

How To Apply In University of Cambridge?


Please note

All deadlines for the submission of the application are 12:00pm (midday) UK time on the date stated.

Preparation

  1. You should thoroughly research your prospective course, its requirements, deadlines and course costs in the Course Directory before you think about completing and submitting the online application form.
  2. Make sure you are clear on the separate Application and funding deadlines.
  3. Check that you have the relevant required supporting documents (eg transcripts, CV etc) in pdf format ready to upload.
  4. For your academic referees, you should ensure you have their consent before you apply and have the correct email address for each (preferably an institutional email address). Applicants can request references before the submission of their application and should do so as early as possible.
  5. You should have a choice of up to two Colleges to consider your application.

Apply using the Applicant Portal 

When you have completed the necessary preparation, and you are ready to begin your online application, you should take note of the following important information:
  1. Go to the Course Directory and find the course you wish to apply for, then click the Apply Now button in the How to Apply tab.
  2. All applications must be completed in English.
  3. You can request your references in the Applicant Portal, and see when these have been received.
  4. You must then submit your references, along with all other required supporting documentation, at the same time as the rest of your application.
  5. You can also apply for funding via the Applicant Portal.
  6. There is an application charge of (GBP sterling) £50 per application (unless you are from a country which is eligible for fee waiver). The Graduate School of Life Sciences has a scheme which enables three applications to be made with payment of a single £50 application fee. A list of other eligible courses and further information can be found here. You can make the payment by providing your credit card details to our secure server when you submit your online application. More information about the application fee can be found on the Application Fee page.
  7. You will need to submit a separate application, with separate supporting documents, for each course you wish to apply for.

Upload Supporting Documentation

Your application is not complete without the required supporting documentation which must be submitted through the Applicant Portal as part of your application.
Please check your course's entry to see what supporting documents you will be required to submit. For more information on what the specific requirements of each document are, and how to submit them, please see the section on Supporting Documentation.

Monday, March 12, 2018

How to Download Windows 10 For Free in 2018


Ever since Microsoft launched Windows 10, it’s made the OS officially or unofficially available. Officially, you stopped being able to download or upgrade your system to Windows 10 on July 29, 2016. Unofficially, you can still download an upgrade license for the OS. And despite statements from Microsoft that it would absolutely-no-fooling-really-truly kill the Windows 10 free upgrade offer on December 31, 2017, that offer is still good.

Microsoft’s first giant push to convince customers to use Windows 10 was marred by an increasingly heavy hand as the campaign went on, to the point that it was both accused of malware tactics and later admitted to the same. We’ll never know exactly how many people avoided the upgrade for this reason alone, but some readers have indicated they were disgusted by the company’s behavior and refused to update.

Without implying that Windows 7 or Windows 8 users have to change their mind on that, it’s worth noting Windows 7 exits support by 2020, with Windows 8.1 out of long-term support in 2023. Windows 8 users have a little while, Windows 7 users have less. Microsoft also now locks out updates on Intel and AMD systems based on Kaby Lake, Ryzen, or Bristol Ridge, though there are some ways to bypass that block. Either way, Windows 10 may be a nice OS to have as an option, even if you don’t immediately start using it.

Here’s how you can still get a free copy of Windows 10 directly: Visit this webpage, attest that you use assistive technologies baked into Windows, and download the executable provided. It’s that simple. Maybe it’ll still vanish soon, maybe it won’t, but we don’t recommend waiting. Better safe than sorry and whatnot.

As for why Microsoft keeps threatening to pull the rug, I’m guessing the company has seen adoption rates from already running computers fall off over time. It’s been over 2.5 years since Windows 10 launched, and MS was never going to leave this backdoor in its own policy open forever. If you haven’t upgraded by now, I suppose Microsoft thinks you’re never going to actually upgrade, and OEMs would probably be happier if MS shut down the option since it competes with their ability to offer Windows 10 as a new OS on their devices.

Microsoft has also plowed ahead with the idea of Windows-as-a-service, in a bid to convince customers that being upgraded to the latest and greatest is the best way to be. Closing this loophole at some point may be an attempt to shove customers towards new hardware as opposed to letting them upgrade existing installations — though again, I’m not sure the volume is high enough to matter either way.

How to make a full backup of your Windows 10 PC


It's not the question of if, but when. Sooner or later the hard drive on your computer will fail, malware may take control of your system, or a critical error may corrupt your data. If you don't make regular backups, you could lose important documents, irreplaceable pictures, and settings that you may have spent hours configuring on your device.

On Windows 10, there are plenty ways to backup your system and data without having to resort to third-party solutions, and the built-in system image tool is one of them.

A system image is a backup that contains everything stored on your computer, including the full installation of Windows 10, settings, applications, and all your files, as well as any additional drives you may have connected. If your computer fails, you can use the system image backup to restore your computer, getting you up and running in a matter of minutes on the same or different hard drive.

In this Windows 10 guide, we walk you through the steps to create a full backup, including all your settings, apps, and files, using the built-in system image tool.

How to create a system image backup of Windows 10

While you can store the backup on a secondary drive, network location, and even use blanks DVDs, it's best to connect to external storage, which you can quickly disconnect and store in a safe place.

To create a full backup using Windows 10's system image tool, you need to connect external storage with enough available space and then use these steps. (If you don't know exactly how much space will be needed to store the backup, you can always connect the drive, and the wizard will let you know.) Here's how:


  • Open Control Panel.
  • Click on System and Security.
  • Click on Backup and Restore (Windows 7).
  • On the left pane, click the Create a system image link.
  • Under "Where do you want to save the backup?" select the On a hard disk option.
  • Using the "On a hard disk" drop-down menu, select the storage to save the backup.
  • Click the Start backup button.


Once you completed these steps, the wizard will proceed to create a full backup of your system, including everything that is stored on the main drive, as well as the system reserved partition.

During the backup process, Windows 10 will also use Shadow Copy, a technology that allows you to create a backup while files are still in use, which means that you can continue to work normally as the image is being created.

After the backup is done, you'll be prompted to create a system repair disk to access the recovery options if your computer is unable to boot. While it's recommended to create the repair disc, you can always access the recovery options using a bootable USB drive with the installation files for Windows 10.


Quick tip: You can always create a repair disc by clicking the Create a system repair disc link within the Backup and Restore (Windows 7) settings page.
Finally, remember to disconnect the external backup drive and store it in a safe place.


How to restore a system image backup of Windows 10

If your computer won't boot, you want to start over with a previous installation, or you're replacing the main hard drive on your device, use these steps to recover from a backup:


  • Connect the external drive with the system image backup to your device.
  • Connect the disk that contains the system repair files (or USB bootable drive with the Windows 10 installation files) to your device.
  • Reboot your computer.


Quick tip: If your device isn't booting into the Windows Setup wizard, you'll need to change your system's BIOS settings to make sure it can boot from the USB or DVD drive. Usually, you can access the BIOS by starting your device and hitting one of the functions or ESC keys, but make sure to check your manufacturer's support website for more information.

  • On the "Windows Setup" page, click the Next button.
  • Click the Repair your computer link located at the bottom-left corner.
  • Click the Troubleshoot option.
  • Click the System Image Recovery option.
  • Choose the target OS. (In this case, Windows 10.)
  • On the "Re-image your computer" page, select the Use the latest available system image option
  • Click Next.
  • If you're restoring a full backup to a new drive, you can also select the Format and repartition disks option. (Use this option carefully, as it will erase any existing partitions and disks on your computer.)
  • Click Next.
  • Click Finish.
  • Click Yes to confirm that the backup will replace the data on the drive.

After completing theses steps, the recovery process will begin. Remember that the time to finish the recovery will depend upon the amount of data and your hardware configuration.

If it's been a while since the last time you created a full backup, remember to use Windows Update on the Settings app to download the latest security patches.

Wrapping up

Usually, a system image backup comes in handy to create a copy of your entire system before upgrading to a new version of Windows 10 in case something goes wrong or you want to rollback to a previous version if your device is experiencing issues after Windows 10 automatically deletes the previous installation.

It's also a good idea to create a full backup regularly in case of system or hardware failure, or after spending many hours configuring your system with a clean installation and applications. Then if something goes wrong, malware sneaks in, or you simply want to start from scratch, you can always restore your system in minutes with all your settings and apps, including those traditional desktop programs.

The only caveat with this particular feature is that you must be proactive making full backups regularly, as you can only recover your system and files since the last backup you created. Any documents, settings, and apps you may have created, changed, or installed after the backup won't be recoverable through this process.

In addition, this is a feature designed to recover your entire system, not to restore files, settings, and applications individually.

If you want to keep an up-to-date copy of your files, you should think about using the system image tool in combination with File History or OneDrive.

Personally, I like to create a base backup of my computer after a clean installation with all my applications configured just the way I need them. Then I setup File History and OneDrive to have up-to-date on-site and off-site backups of my files.

Although this guide is focused on Windows 10, the system image backup tool has been around for years, which means that you can also refer to these instructions if you're using Windows 8.1 or Windows 7.

Monday, February 26, 2018

How to Sync WordPress With Facebook Profile


A WordPress blog can be a valuable source of information about and exposure for your small business or personal enterprise, a blog only works as well as its advertising. You can link your WordPress blog to social networking sites that allow you to notify friends and followers of updates and posts. In the case of social media giant Facebook, link your blog to the site profile so that blog updates appear in your Facebook feed.

1. Log in to your WordPress account from the main WordPress.com page.

2. Click your user name in the upper right corner of the screen. Click on the "My Blogs" tab, followed by the "Dashboard" link underneath your blog listing.

3. Roll your mouse cursor over the "Settings" option from the menu located on the left side of the screen. Click on the "Sharing" option that appears in the pop-up menu.

4. Select the Facebook entry from the "Publicize" listing located at the top of the Sharing page. A window appears, asking you to authorize your Facebook account. Click the "Authorize Connection with Facebook" button. WordPress sends you to the external Facebook login page. After you enter your credentials, you return to the WordPress page to complete the process.

How to Create a Free Dating Site

Keeping the site free can help grow your user base, but it means you'll have to design your service around generating revenue from other sources.


Dating websites are a pretty specific sub-group in the social networking world, and they offer a potentially lucrative business opportunity to web-savvy entrepreneurs. Keeping the site free, rather than subscription-based, can help grow your user base but it means you'll have to design your service around generating revenue from other sources.

Look at other online dating websites to determine staples that your dating website must offer to be competitive. Use the information you gather to identify what you could do differently to set yourself apart from other free dating sites.

Check the websites of companies that offer affiliate programs and ad networks. These two methods, along with selling member personal data and ads on your site, are the two major means of generating revenue on a dating site without charging a subscription fee, as Jonathan Fox of the Free Dating Sites website outlines. Decide which revenue generation method you will use on your site.

Select a Web host and domain name. The Web host provides space on a server for your Web pages. Free hosting is available, but paid hosting generally is better because you get more space, better monitoring and an overall more stable website. Choose a host that can provide the amount of bandwidth you project will be necessary as the site grows.


  • Register your domain name as your business name with your state licensing agency.


  • Open a separate bank account for any monies earned from the site. This will make tracking your revenue and expenses much easier.


  • Select software or site building tools to create your site. Some Web hosts provide free tools when you purchase your web hosting service, but independent software applications are available. NVu is a good example of an independent What You See Is What You Get --WYSIWYG -- website creation and editing program. Alternately, hire a programmer to build the site -- this is much more expensive but allows the most customization options.


  • Use your information from Steps 1 and 2 to determine the overall design for the dating website. Navigation is the most important aspect of any website. For a dating website, the most important navigation controls are those that link to the profiles of others, profile creation tools or templates and chat. Color also is important for a dating website. Red, for example, is associated with fiery love and passion, and may not be as appropriate for a website themed for "sweet" relationships.


  • Design each individual page of the site. Make getting a good balance between your revenue sources and the true purpose of the site a goal for every page. Do not let the ads on the site detract too much from member profiles.


  • Upload the individual website pages to the Web host server and publish the site using the instructions for your specific website creation or editing software. Promote the sites on other sites you have, as well as your email signature and more traditional methods such as magazine ads. Work closely with your Web host, as well as your programmer if used, to maintain the site as needed.

Many dating websites allow video streaming so visitors can have video chats. Do not use a video platform that requires extensive resources or which is not compatible with commonly used browsers or devices. Higher resolutions mean more data, which means you will need more bandwidth if you want to offer video chat at high quality.

Create a brief but clear terms and policies notice on your website. On this notice, have users verify they are at least 18 years of age, particularly if your dating website has any clearly sexual themes or content. Make entry into the site contingent upon verifying the terms and policies.

Thursday, February 8, 2018

How to Turn Off “Last Online” On Instagram

Through the Last Online feature, the other people on the same network are able to get about the last time at which you was live on the network. This is somehow useful for the users yet this is even felt to be privacy bothering for some guys. Instagram is one of the most popular social media networks that is even equipped with this function where the users could be able to view the last online. If set to be shown to the others this allows the others to identify the last time you worked on the Instagram. By default this feature is on inside the Instagram and yet the people are able to get the last online data. Now for those who are seeking for turning off this feature they might have known that there is no direct option available inside the Instagram through which the Last Online could be disabled. Here in this article, we have written about the method through which the user could be able to turn off the Last Online on the Instagram and hence get the anonymous appearance over the network. For those who are interested to know about the method, they are requested to please read the whole information until the end so as to get the whole data about the method. So let’s get started with the method below!

How to Turn Off “Last Online” On Instagram


The method is quite simple and easy and you just need to follow the simple step by step guide discussed below to proceed.


Steps to Turn Off “Last Online” on Instagram

#1 First of all, run the Instagram app on your Android or iOS device. This is necessary to run this app on the smartphone device so that you could be able to set the function to off. Some of the people to use the computer system for getting the view of the Instagram and hence they would not be able to carry on this method. Once the app is launched please skip to another step so as to carry on with the method.

#2 Now log on to your Instagram account through the app and thereafter go to the profile through inside the app. This is really simple to be done, Android users simply tap on the Menu option. iOS app users tap on the Settings and then Edit profile options from inside the app.

#3 On both of the devices when you will reach to the Settings simply scroll down to the point where you see the option named Show Activity Status. This is the option that would be affecting your last online feature of the Instagram. Turn this option to turn off and then save the settings. This will instantly remove your last online status from the network and none of your followers or the people added to you could be able to get about your last time of activity on this network.

#4 This is all about the method, it is all reversible and you could be able to set it to turn on anytime. Trace down to the steps above and reach to the Show Activity Status option and then turn it on again if you wish!


So finally after reading this article, you have got the information by which you could now be able to set Instagram such as the last online is turned off. We have presented this information or the method in really easy to grab way and most probably everyone could get the data instantly. We hope that you would have liked the information of this post if it is so then please share the post with others. Do share your opinions with us about the post data through using the comments section below. Your indulgence in our post is really valuable, please make it as much as much you can. At last never the fewer thanks for reading this post!

Monday, February 5, 2018

How to use Two Keyboards and Mice on One Computer


Have you ever wondered if you could use two mice on a single PC? No, you are not the only odd duck out there! There are plenty of scenarios where another set of keyboard or mouse seems quite handy like – using another wireless mouse from a distance while watching a movie.

The idea sounds cool, right? Or while playing games like FIFA, you could use another keyboard for your mate to have a marathon gaming session.

I could go on for hours about how it can make the best of the situations. So, folks, here are some of the ways to use multiple keyboards or mice on your computer, enjoy!

Simple Solution: Connect Them Both
If you have never tried this before now’s your chance, You know, Windows can detect multiple keyboards or mice and even lets you use them without a problem. All you need to do is plug it in, all done.

Windows will take a few moments to add its driver but once it settles in you can efficiently use the two mouse on one computer without any problem at all.

Same goes for keyboards. After plugging it in, you’ll be able to type using both of them without any hassle, pretty cool.


This usually works best if you want to use it for your TV. You can easily mirror your PC to your TV and then control it with a wireless mouse. Both the devices will work the same way. So, you can keep switching back and forth, just as you like.

Third Party Tool: Use TeamPlayer
Well, the simple solution is excellent, but it only gives you control over one cursor. What if you want to use two separate cursors at a time? This tool is the answer for that.

Using two separate cursors using TeamPlayer is easy. It will get the job done in a jiffy. All you have to do is to download it from the website and install it.


Although you’ll get a trial version, it’s not free of course. But it will be useful if you only need it for a short time. Or you could buy it if you need it in the long run.

After you install it, you have to click the trial tab and then hit the Start Trial option to start it.

A small window will appear which would control the app. You’ll be able to add a red box to your screen using the right screen like button. This red box can restrict the other mouse’s movement.

So, if you don’t want the other person using the mouse to use more than one app, you can use this feature. But you can also disable this feature by clicking that button again. It will allow the other mouse to have full access to the screen.


How To Use TeamPlayer?
It may be a little bit different than other tools. After you start to use it, it will begin to split the device inputs. The first mouse connected to it works as User 1 and then User 2 and so on.

The same goes for keyboards. Once you connect them, you can use them simultaneously. So, one can type a document, and other can surf the net. It’s effortless.

If you want to tweak it further up, you can head to Settings. It will allow you to change the cursor colour, size or labels. You can even alter the speed individually, just to distinguish them. Also, you can use the shortcut tab to start or stop the multi-keyboard mode.

You can even change your name from User 1 to whatever you want.


Although it looks pretty impressive, it costs a great deal. So, unless you are a businessman, I wouldn’t recommend using this solution.

Logitech's Unifying Receiver

All the mice and keyboards of Logitech now comes with a Unifying Receiver. You can plug in it into a USB and connect other devices. You can use it to connect up to 6 devices! But they have to be all Logitech of course.

So, if you have multiple keyboards and mice of Logitech, you can use it all at once without another software.

You need to have Logitech Unifying Software on your system. If you don’t have it yet, just install one and you’ll be able to use this method.


The software will lead you to how you can add multiple devices or switch them on and off.

Friday, February 2, 2018

How To Add A Subdomain In Blogger From Godaddy


Google's Blogspot service, also known as Blogger, gives users the ability to assign a custom domain name for free, as long as the user presently owns the domain name. If you have a domain name registered through GoDaddy, and want to direct it to your Blogspot blog, you can do so with ease. If you want to redirect a subdomain to your Blogspot blog, you'll have to create the appropriate record in your GoDaddy DNS manager.

Read Also: How To Add Custom Ads.txt File To Blogger Website

1. Sign in to your GoDaddy account. Click on "My Account," and then click on "Domains." Click "Launch" beneath "DNS Manager."

2. Click on "Edit Zone" next to the domain name you want to use.

3. Click on "Add Record," and then select "CNAME (Alias)."

Read Also: How To Disable Picture Downloading In Blogspot

4. Type the desired subdomain name in the "Alias" box. In the "Points To" box, type the following: ghs.google.com

5. Click on "Save Zone File."

6. Sign in to your Blogspot account. Click on "Settings." Click on "Publishing."

Read Also: How To Show Star Ratings In Google Search Results For Blogger Blog

7. Click on "Advanced Settings," and then type your custom subdomain in the "Your Domain" box.

8. Fill out the word verification puzzle, and then click on "Save Settings." Choose whether or not to redirect the primary domain to the subdomain.

Thursday, February 1, 2018

How To Watch Youtube Videos Without Internet


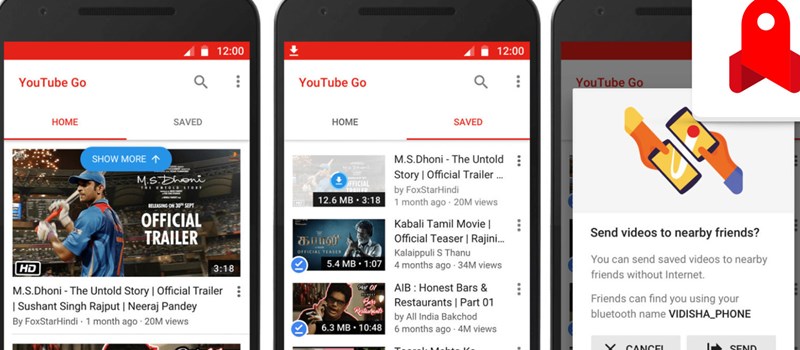
Watch youtube videos on the internet using the Google Youtube go app that will let you get the youtube offline for easy access when you don’t have the internet. Have a look at full guide discussed below.
Google has launched up the new version of the app for the Youtube named “Youtube GO” that is made with the slow Indian network connections under considerations. This app is so very special because of the reason that it has the capabilities to let it’s users watch the Youtube videos for Offline. You could say that this app is not the totally offline client for the youtube but it could be used with the lowest possible network speed that is even on 2G connections and there shall be no buffering and broken connections while playing up the videos inadequate format and resolution.This app could run much more fluently than any other youtube app and hence this will surely attract you every time you go to the Youtube videos streaming. Here in this article, we have discussed a lot about this app so you should go and read it out for gaining more info about the Youtube GO app!

How To Watch Youtube Videos Without the Internet

As this app is now going to help you in watching youtube videos without the internet and you will surely gonna love this. So let’s have a look at features and benefits that you will get with this app.

Features of the Youtube GO app:


#1 Discover relatable videos on the Home Screen: On the home screen of the Youtube GO app users can easily find up the trending as well as popular videos, therefore, you won’t feel it like any other app but love to use it as a great new Youtube app replacement as the official Youtube app also has similar looks that this app have provided.
#2 Preview Videos: The great new feature of this app is that users could now be able to preview up the desired videos, it is not the whole video playback but a short time show back of the inside of the video that could help you to find about the content of the videos and hence you could start to download up your best video which you want by finding it from the preview.
#3 Choose desired resolution of the Videos: This thing is what you people might be very much familiar with while using up the Youtube but in this app, you get up more options for the different video resolutions that could help to play up your video in the network connection with varying speeds. You can also choose to download or save your desired videos in any of the resolutions from the list of options available.
#4 Sharing Videos easily: This is another thing that this app excels at, you can now easily share your youtube videos with your friends at no data cost as the internet connection won’t be required and you can do that all when offline.
This app is really something special that could help to join many many users around India to the official youtube Network making it a more profitable job than ever. This app’s main preference is its ability to load up the youtube videos at much higher rate in any slowest available connection and the users would definitely want it but because it is still not launched for every user, therefore, you shall have to wait for it if you haven’t got it yet because Google is working on it!

How To Make Money By Generating Online Leads For Companies

Generating online leads for companies isn’t as complicated as it sounds. In fact, you may already be doing it. Simply put, you’re sending traffic to an advertiser’s website and the advertiser will ask them to join their mailing list or complete a survey or some other type of simple action. And there are almost as many methods for making money with online lead generation as there are Internet marketers on the Web.

A lot of the affiliate programs you promote are for lead generation purposes. When you send someone to a toolbar download or to get a free horoscope reading or download a discount coupon, those are lead generation techniques used by advertisers to gather up all the email addresses. They don’t mind paying you a dollar or two for each of your clicks as long as they keep getting those addresses. Just like you, advertisers need to build marketing lists, too.

In order to generate leads, for companies or for your own business, you’ll need to drive traffic to the offer. There are two types of traffic you can capture: Organic traffic and paid traffic. Organic traffic is traffic generated through linkbuilding and creating content that appears on the search engines. Paid traffic is traffic that you get from using paid ads, like Adsense Ads, to drive traffic to the lead generation page.

How to drive organic traffic for lead generation
The benefit of organic traffic generation is that it doesn’t cost anything but time. Use relevant keywords to create articles and blog posts to bring search engine traffic to your blog. Use article marketing, blog and forum commenting, and Web 2.0 properties to create backlinks that will also index for your keywords and at the same time they’ll help raise your site’s overall ranking.

The downside of organic traffic generation is that it takes a lot of time to create all of the content you’ll need to pull in a large amount of traffic and it also sometimes takes days or weeks for that content to show up on the search engine indexes. However, if you use your keywords properly and attract tightly targeted traffic your blog will produce income for a long time.

How to drive paid traffic for lead generation
Again, you’ll need to create some quality, keyword rich content for your blog or website but you won’t have to worry about the off-site linkbuilding unless your goal is to build up a long-term niche blogging business.

The keywords for paid traffic generation are important. You’re going to be paying for keyword rich Adsense ads to drive traffic to your site and the content you link to from your ads must be relevant. Otherwise, as soon as the reader hits your site they’re just going to click away without bothering to click through to the advertiser’s lead generation form.

The keywords you use for your ads will also be used to determine what sites your ads appear on. So let’s say you’re trying to attract traffic who will be interested on handing over their name and email address to that horoscope business that’s paying you to generate leads.

Use relevant keywords in your ad so it appears on other sites where people might be looking for information about horoscopes. Those are the people most likely to click on your ad, visit your page, and sign up for the advertiser’s offer.

Use relevant keywords in the content on your blog so when the traffic arrives they’ll stick around long enough to click on your lead generation page.

Send your traffic to a landing page
One mistake that a lot of marketers make is to send all the traffic they generate directly to the advertiser’s landing page. That’s great. The advertiser gets their email address and you get a buck. Whooppeeee!

Put a landing page between your visitor and the advertiser so you can get their email address, too, and add it to your own list of business leads. Advertiser have all the fun?

This is also a good idea if the advertiser has a crappy capture page that isn’t converting as well as you’d like or if he’s maybe asking for more of a commitment on the offer. By sending your traffic to a landing page you can pre-sell them a little more on the offer so that when they do go to the advertiser’s page they’ll be more apt to follow through.


Generating online leads for companies is usually a pretty easy way to make money online. Use paid traffic generation techniques for trendy-type offers, where you need to get eyes on the page fast before the topic falls out of popularity. Use organic methods for a long-term, residual income type niche blog. But above all, try to get a landing page in there wherever possible so you can benefit from the leads, too.